When choosing to store silage in a horizontal silo — such as bunker, trench or pile silos — be sure to keep in mind the following advantages and disadvantages:
Bunker Silos
Pros
- Reduced spoilage across top of structure
- Easy to fill
- Easier feedout than other methods
Cons
- Requires greater cost of investment compared to a drive-over pile
Pit or Drive-Over Pile
Pros
- Requires low investment
- Offers greater feed inventory flexibility than other methods
- Can be created in any stable floor
Cons
- Greater surface space occupied
- Lower compaction capacity
Preparation
With these storage structures, it’s important any old silage and dirt be removed. Ideally, the space should be left open to the rain and sun, which helps further sanitize the area. Click here for more information about preparing the ensiling site.
Asphalt flooring is a good choice for bunk, trench or pile silo floors. The material is unaffected by silage acids. In addition, the lack of seams in an asphalt floor eliminates the risk of water seeping through a seam and undermining the floor. When pouring an asphalt floor, make a well-packed base and use at least 4 inches, or 10.16 cm., or preferably 6 inches, or 15 cm., of asphalt.
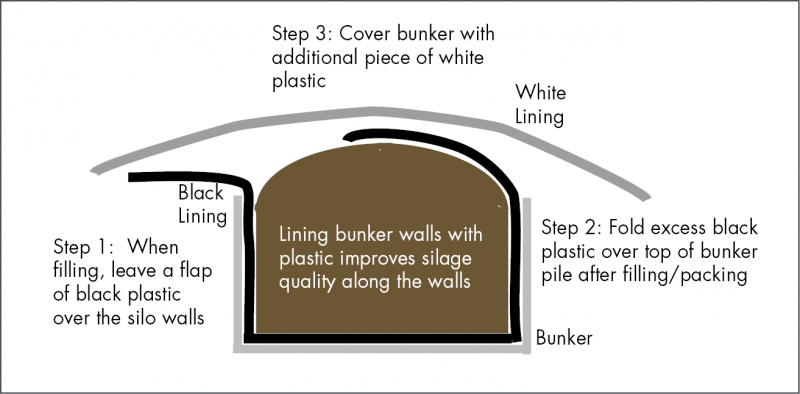
Lining the inside of bunker walls with plastic prior to filling prevents water from seeping in at the edges. The results of this additional effort is the silage quality and dry matter (DM) along the wall is the same as that throughout the silo. This procedure can be accomplished by placing a small amount of old silage on the bottom of the plastic at floor level. Stretch the plastic to the top of the wall and then extend it an additional 6 to 8 feet, or 1 to 2 m. Sealing is completed after filling by extending the wall plastic back out onto the top of the pile prior to covering with the top plastic.

Filling and Packing
The effort put into packing — layer thickness, packing weight and time, and harvest rate — has greatest effect on silage density. Oxygen must be forced out to facilitate anaerobic fermentation. Inadequate packing causes problems both at ensiling and at feedout, resulting in higher DM losses and reduced silage quality.
The minimum recommended pack density for haylage and corn silage is 47 lbs./f3, or 750 kg./m3, on a fresh weight basis at 30% DM or 65 lbs./ft3, or 240kg./m3, on a dry-weight basis. For HMC, 45 lbs. on DM basis per f3 at 70% DM. A web-based spreadsheet developed by the University of Wisconsin for calculation of packing density can be accessed at fyi.uwex.edu. Furthermore, the porosity can be used an indicator of packing density and should be at a maximum of 40% for silages in general.
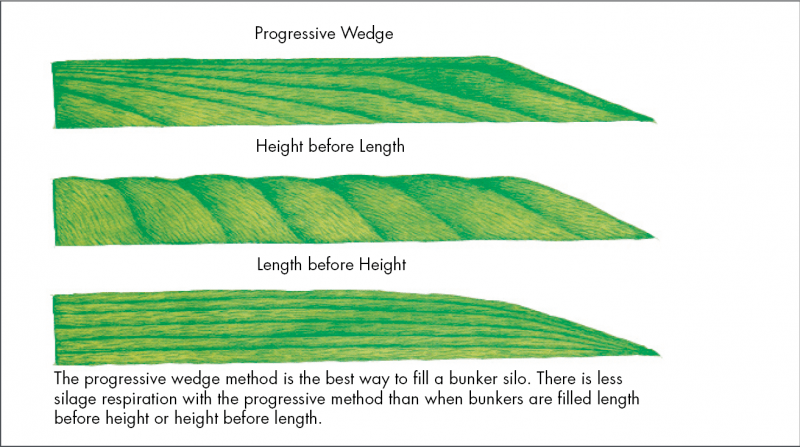
Bunker silos and drive-over piles should be filled using the progressive wedge technique to minimize the surface exposed to air and to maximize packing efficiency. Slopes should not be greater than 4:1 (length: height) both for safety and to allow effective packing and filling should be done in layers of 6 inches, or 15 cm., or less.

Packing vehicle weight and the thickness of the layer of silage being packed are two of the main variables influencing silage density. The estimated amount of packing weight in pounds needed can be calculated by multiplying the estimated tons of crop delivered to the silo in an hour by 800. The estimated packing weight in kilograms can be calculated by multiplying the estimated ton of crop delivered to the silo in an hour by 365.
When packing, keep layer thickness to 6 inches or less.
Packing is an important time to observe safety rules. For more safety tips, click here.
Covering and Sealing
Dry matter losses in bunkers and piles are reduced greatly by covering effectively with suitable plastic weighted down with tires or gravel-filled bags. Covering also improves the quality of the fermentation and reduces production of undesirable compounds in the top layer. The improvement in yield and quality translates into improved digestibility of nutrients.
Use plastic that is at least 5 mm thick. Dual layer – black inner and white outer – plastic resists deterioration well. Cover the entire slope in front of the bunker, or around the drive-over pile, with plastic when filling is complete to prevent excessive spoilage in these areas. Oxygen barrier films are less permeable to oxygen than standard plastic and reduce top spoilage.
Tire-to-tire placement is a popular way to keep plastic in place. Gravel filled bags, cut tires and truck tire sidewalls can work too. It is imperative there is sufficient weight along the edges of the plastic to keep the plastic in place and to prevent air infiltration.
The structure must be sealed immediately after completion. If work is completed over several days, there is no need to put the cover on each evening. However, be sure to carefully compact and cover the structure in the case of bad weather or consecutive days of harvest delays.
Plastic covers should be inspected on a regular basis. Observe the top cover for tears or animal damage. Ensure edges and seams are weighed down with heavier weights. If spoilage occurs, all spoiled feed should be discarded rather than fed.
Feedout
For successful feedout, the key steps are to:
- Remove all spoiled silage
- Keep the silage face vertical and tight
- Remove enough silage to avoid any heating and do not pile silage ahead of feeding, as this can result in composting. Recommended feedout rates are 6 to 12 inches (15.24 to 30 cm.) of silage per day. Reach the higher end of the range during warmer temperatures or with lower density ranges.
- Premix the silage that has been obtained from the entire face with the loader bucket or mixer wagon prior to feeding
- Strive to have as little loose silage at the end of feeding as possible
- Keep the leading edge of plastic sufficiently weighted down to prevent air infiltration beneath the plastic
- Remove plastic at least twice weekly, or as often as necessary, so that top, spoilage does not occur prior to feeding
- Consider the use of a bacterial forage inoculant proven to secure the aerobic stability of the silage face
Spoiled silage should be discarded. Reductions in intake and digestibility can occur if this feed is included in livestock diets.
Constantly observe the surface for spoilage. Often this spoilage is occurring because too much plastic is being taken off and the surface is left open too long. It can also occur if the leading edge of plastic is not properly weighted and air is infiltrating beneath the plastic.
If possible, use a bunk defacer or rake to remove silage. Defacers:
- Do not cause fracture lines that allow air into the silo
- Mix the silage from across the height of the silo, reducing ration variability
- Break up haylage clumps, which can reduce mixing time
- Leave a straight face, which does not catch water
- Can cause less damage to the silo equipment used to remove silage from the bunker
When using loader buckets to remove silage, either:
- Shave across the width of the silo, or
- Try to remove a chunk of silage from the bottom of the silo and then chip downward as the bucket is progressively moved.
For more tips on feedout rates and how to avoid common feedout issues, click here.
Additional Reading
- Packing density spreadsheet available at fyi.uwex.edu


